Advantages of multi use spillways:
1) If you are not sure how aggressive you want the water flow, purchase the larger pump and by adjusting flow you can experiment.
2) During the day or while having a party, set the pump for projecting sheet, then after dark turn back the flow for a soft and gentle water sound for complete relaxation.
Disadvantages:
They do not do either job as well as a purpose designed spillway such as the Deluxe Cascading Sheet descent or Deluxe Projecting Sheer descent spillways.
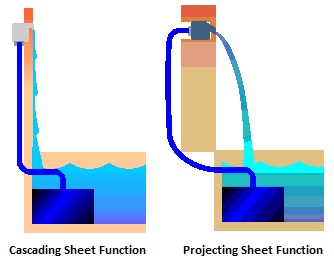
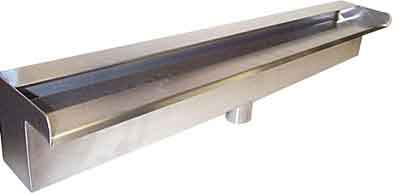
**What is a cascading sheet descent spillway? A stainless steel box with a delivery spout is mounted in a wall, water flows softly from the spillway and runs down the wall face into the pond or pool. Sheet descent units have been designed with a multi chamber internal baffle system to promote even flow over the spillway.
***What is a projecting sheer descent spillway? (also known as sheer descent water feature) stainless steel box with a delivery spout is mounted in a wall, a large volume of water passing through this special unit producing a solid sheet of water that projects away from the wall. The sheet of water does not touch the wall, but goes directly into the pond.
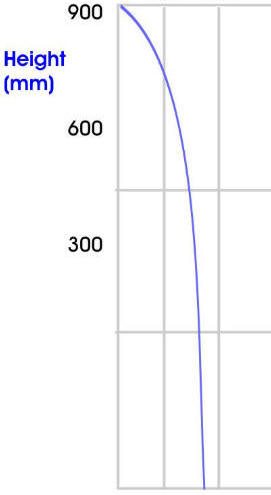
Hint 1: If being used as a projecting sheet effect, never mount higher that 900mm above the water. The further the water drops, the narrower it becomes due to surface tension. The drop in the photo's above is .9m to give you an idea. Another way to understand this tapering effect is that for every 50cm of drop, the width of the sheet of water narrows by about 10 cm. After about 90cm of drop the sheet starts to break up.
Hint 2: Any elbows or tees in the system will reduce flow. On the 2 inlet model spillways, it may be desirable to use two pumps, this will avoid the need for a tee.
Hint 3: Glass .. When water is run down glass, to improve water flow and maintain it's full width you should angle the wall between 2 to 5 degrees
Hint 4: Acrylic .. When water is run down Acrylic, to improve water flow and maintain it's full width you should angle the wall between 5 to 7 degrees
Hint 5: How to neatly get the electrical cable from the pump and the water tube out of the pond cleanly and allow for service. Click here
Step by Step Guide for selecting your spillway
|
|
Step 1
Choose the length of spillway that will best suit the installation position that you desire. |
|
Step 2
Make a decision on what function is most appealing to you:
- Projecting Sheet (also known as Sheer Descent)
- Sheet Descent (softly down the wall)
- Both (refer to Projecting Sheet charts as the flow can be reduced on a larger pump to gain the Sheet Descent function)
|
|
Step 3
Measure the mounting height of where the spillway will be positioned. This is measured from the top of the pond water (not the pump position) to the spillway.
|
|
Step 4
Choosing your pump.
- Refer to the relevant chart below (Projecting Sheet or Sheet Descent)
- Find the spillway length that you have chosen, make note of the minimum litres per hour that are required to make a good display. Special note .. the litres per hour quoted are at the spillway, not at pond level. Example if the required flow is 1000 litres per hour, you will not need a 1,000 litres per hour pump, but a pump able to pump 1,000 litres per hour at the required mounting height , it may be a 2,000 litre pump, see the pump chart at the bottom of each pump page.
- Decide if your pump will be inside or outside the pond
- Finally decide on the quality of pump that you desire starting from the best quality on the left.
Once you have decided on a pump, click the link from the chart to visit the pumps page and refer to the chart at the bottom titled 'Flow rates at different pumping heights'. From this chart compare the litres per hour that the pump is capable of producing at the mounting/head height of where your spillway will be mounted. If this value is equal to or greater than the minimum litres per hour required for your spillway length then you can be 90% sure that you've made the right choice.
|
|
Step 5
Choose your plumbing kit
- Under the multi-function chart refer to the relevant section (Projecting Sheet or Sheet Descent)
- Find the spillway length that you have chosen
- Decide if the supplied hose length is adequate, if this needs to be modified, let us know
|
|
Step 6
Choose your through wall fittings (if you plan on plumbing through the pond or wall)
|
|
Step 7
You should now have everything you need to order all the components to complete your spillway. Go ahead and make the order either online or by calling us on 1800 607 388.
|
Choosing your pump - additional information
 Projecting mode - Maximum projection 75mm
How to choose your pump:
A projecting sheet spillway requires a flow of at least 850 Litres per hour for every 100 mm of spillway width. While a sheet descent sheet spillway requires a flow of at least 350 Litres per hour for every 100 mm of spillway width. This flow rate is measured at the spillway, therefore in choosing the pump, the distance* between the surface of the water and the spillway is a factor that only you will know. We have therefore made a number of suggestions below based on about 1.0m mounting, covering a variety of price points. The (list starts with the best quality and works right). *The higher the water is being pumped, the larger the pump must be, also on 2 and 3 inlet spillways the flow must be higher because of the tee that is required in the plumbing.
Please note: the below pumps are only suggested possible pumps, there are many more alternatives available.

